Introduction:
A motorized focuser can dramatically improve the sharpness and consistency of your astrophotography—but only if the motor is up to the task. The Pegasus Astro UPBv2 (Ultimate Powerbox v2) includes a built-in stepper motor controller, offering a sleek and efficient way to automate focus. However, pairing it with the wrong motor can lead to skipped steps, jittery motion, or worse—no movement at all.
If you’ve ever struggled to achieve perfect focus due to inconsistent motor behavior or noisy operation, you’re not alone. Choosing the right stepper motor may seem straightforward, but the details—such as torque, voltage, step angle, and mounting compatibility—can significantly impact your setup.
So, what exactly makes a stepper motor compatible with the UPBv2? How do you know which one will work best with your specific focuser and telescope?
In this guide, we’ll break it down step by step. You’ll learn how the UPBv2 communicates with stepper motors, which specs matter most, and how to match them to your scope’s weight and focus mechanism. We’ll also cover reliable motor models, installation tips, and troubleshooting advice to ensure consistent, backlash-free focusing, session after session.
Whether you’re upgrading an existing system or building a new one from scratch, this article will help you choose a stepper motor that works reliably—no guesswork or trial and error necessary.
Understanding the UPBv2 Focuser Environment
What Is the UPBv2 and Why Motor Selection Matters
As mentioned in the introduction, the Pegasus Astro Ultimate Powerbox v2 (UPBv2) is widely used in astrophotography setups because of its ability to centralize power distribution, USB control, and environmental monitoring. One of its lesser-known yet critical features is its integrated stepper motor focuser controller. This built-in functionality eliminates the need for an external focus controller, reducing cable clutter and simplifying power management.
The UPBv2 supports stepper motors directly via a dedicated RJ12 port and includes onboard software control for precise focusing. However, this also introduces a layer of complexity. Choosing a compatible motor is essential because the UPBv2 is not a high-power controller. If the stepper motor you select draws too much current or has a mismatched coil configuration, it may not operate reliably—or at all.
From a hardware standpoint, the UPBv2 typically supports bipolar stepper motors operating at 12V with a current limit of around 1A per phase. Refer to Pegasus Astro’s specifications for exact limits. Motors requiring significantly more current or higher voltage should be avoided, unless an external driver is used, which bypasses the built-in control and adds system complexity.
In short, the choice of stepper motor must align with the UPBv2’s electrical capacity and intended application, as we’ll explore in the following sections.
Common Focus Applications in Astronomy
Focusing mechanisms in astronomy vary depending on the type of telescope and imaging goal. The most common configurations include:
- Crayford focusers: These are popular on refractors and Newtonians. They rely on friction rather than gears and require modest torque to adjust smoothly.
- Rack and pinion focusers: They offer more mechanical grip and are often used in higher-end setups. They may require more torque, but they are less prone to slippage under load.
- Internal focusing systems: Found on SCTs (Schmidt-Cassegrains) and RCs (Ritchey-Chrétiens), these systems typically shift the primary mirror and often require more force due to added weight and mechanical resistance.
Each of these mechanisms requires different performance characteristics from the stepper motor. For planetary imaging, where high magnification requires precise focus, microstepping and low backlash are vital. In contrast, for deep-sky imaging, thermal drift over long exposures becomes a bigger factor, so consistent and repeatable movements are key.
Automated focus routines using software such as NINA, APT, or Sequence Generator Pro (SGP) place additional importance on the repeatability, resolution, and reliability of the stepper motor system. In this context, having a motor that can accurately move in small increments without stalling or overshooting is essential.
Stepper Motor Basics for New Users
Before exploring specific motor models, it’s essential to grasp the fundamental types and specifications of stepper motors. This will help ensure that you select a motor that is electrically compatible with the UPBv2 and mechanically suitable for your focuser.
Bipolar vs. Unipolar Stepper Motors
The UPBv2 focuser interface is designed for bipolar stepper motors, which use two coils and require current to reverse direction within each coil. These motors are more efficient and deliver higher torque than unipolar motors, especially in compact NEMA 17 packages. However, unipolar motors, which rely on a center tap for simpler control circuits, are not directly supported and would require an external driver, which defeats the simplicity of the UPBv2.
In practical terms:
- ✅ Choose a bipolar stepper motor with four wires (two coils).
- Avoid 5-, 6-, or 8-wire unipolar motors unless you can reconfigure them.
Holding Torque, Step Angle, and Microstepping Explained
Holding torque is the amount of torque the motor can exert while stationary. For focusers, 0.3–0.5 Nm is typically sufficient. Too little torque may cause slippage, while too much could damage delicate mechanisms.
Step angle refers to how far the motor turns per step. Standard stepper motors have a 1.8° step angle (200 steps per revolution), while precision variants offer a 0.9° step angle (400 steps per revolution). The smaller the step angle, the finer the control, which is critical for astrophotography focus.
Microstepping is a driver feature (in this case, the UPBv2) that enables the motor to move in fractions of a full step, e.g., 1/8 or 1/16 steps. This reduces vibration and improves smoothness. Although it doesn’t increase the motor’s absolute positioning accuracy, it enhances repeatability and control, which is essential for fine focus routines.
Example: A 1.8° stepper motor with 1/16 microstepping yields 3,200 microsteps per revolution. With a geared focuser (e.g., 10:1), this can result in extremely fine focusing resolution, which is ideal for f/5 or faster optics.
Key Motor Specifications to Evaluate for Focuser Use
As discussed in the previous section, not all stepper motors are created equal, especially when used with the UPBv2’s built-in focuser port. The motor’s electrical characteristics, mechanical compatibility, and movement resolution all directly impact the stability and accuracy of your focusing system. This section builds on that foundation by breaking down the specific motor specifications you need to evaluate before making a purchase.
Torque: Matching the Load Without Overkill
A common misconception in motor selection is that more torque automatically means better performance. In reality, the goal is to match the torque to the mechanical load of your focuser system, not exceed it unnecessarily.
To calculate the required torque, first estimate the combined resistance of your focuser drawtube and any attached imaging equipment. Then, consider the gravitational forces due to the telescope’s angle. Most Crayford and rack-and-pinion focusers require modest holding torque—typically in the 0.3 to 0.5 newton-meter (Nm) range—to achieve reliable, slip-free movement.
Excess torque, particularly in stepper motors with large rotors or high holding capacity, can introduce undesirable side effects. These include:
- Backlash amplification: Strong motors may “snap” the focuser into position, overcoming internal friction and creating slop in gear-based systems.
- Mechanical strain: Lightweight focusers or plastic couplers may wear out faster under constant high torque.
- Reduced efficiency: Larger motors often have higher current requirements, which could exceed the UPBv2’s limit and lead to thermal shutdowns or inconsistent performance.
Bottom line: Select a motor that offers just enough torque to handle your focuser’s load, leaving a small margin of ~20% to account for temperature variation and mechanical drag.
Voltage and Current Ratings
Every stepper motor has nominal voltage and current values, and it’s crucial to align these with the UPBv2’s driver limitations. The UPBv2 typically supports 12V operation with a maximum of around 1A per coil. However, exact specifications should be verified in the latest hardware documentation.
Here’s what to look for:
- Rated current: Choose a stepper motor with a coil current of 1 A RMS or less (or 1.2 A peak) to stay within safe operating limits.
- Rated voltage: Stepper motors are often labeled with voltages lower than 12V. This is normal because they are designed to be driven with constant current, not constant voltage. Focus on the current ratings first.
Overdriving a motor by using one that demands more current than the UPBv2 can deliver will result in:
- Underperformance or failure to rotate.
- Driver overheating or system shutdown.
- Permanent damage to the internal driver circuit.
Additionally, unlike some standalone stepper drivers, the UPBv2 does not offer external current adjustment. Therefore, selecting a motor that naturally fits within its power envelope is essential for reliable, long-term operation.
Step Angle and Microstepping Considerations
The step angle determines the base angular resolution of the motor. Most commonly:
- 1.8° motors: 200 full steps per revolution
- 0.9° motors: 400 full steps per revolution
When paired with microstepping (e.g., 1/8 or 1/16), the movement becomes extremely precise. For instance, a 1.8° motor with 1/16 microstepping generates 3,200 microsteps per full revolution, enabling ultra-fine focus adjustments, which is ideal for fast optics with a narrow depth of field.
So, should you always go for 0.9° motors? Not necessarily.
Pros of 0.9° motors:
- Better raw resolution
- Smoother movement
Cons:
- Typically lower torque, which may require more current and edge close to the UPBv2’s limits
Additionally, while microstepping improves smoothness and vibration, it does not increase positional accuracy. It reduces step size, but it also introduces inconsistencies in microstep spacing due to internal sine wave interpolation. This is acceptable for focusing applications but is worth noting when evaluating motors.
Practical tip: For most users, a 1.8° stepper motor with 1/8 or 1/16 microstepping strikes the best balance between torque, power draw, and resolution.
Physical Dimensions and Mounting
Most telescope focusers and motor brackets are designed around NEMA-standardized faceplate dimensions. The most commonly used size is NEMA 17 (43.2 × 43.2 mm), which offers excellent compatibility and sufficient torque for nearly all amateur astrophotography focusers.
When evaluating a motor’s mechanical fit:
- Confirm faceplate size: Ensure it’s NEMA 17, unless your bracket specifies otherwise.
- Check the shaft’s diameter and length: Focusers typically require a 5 mm shaft with a flat segment for the coupler grub screw. A shaft that is too short or too wide will complicate installation.
- Verify the mounting hole pattern: While NEMA 17 motors share a common faceplate, some off-brand motors may have non-standard thread sizes or offsets.
Important: Always verify that your focuser bracket or mounting plate is designed for the motor’s frame size. Using an oversized motor (e.g., a NEMA 23) may provide more torque, but it can also cause balance issues with smaller scopes or interfere with nearby components.
Electrical and Software Compatibility with the UPBv2
Building on the previous section, we’ve identified the essential motor specifications that influence real-world performance: torque, electrical ratings, step angle, and mounting. However, even a perfectly matched stepper motor may fail to deliver optimal results if it’s not properly interfaced with the UPBv2’s electrical and software systems. This section explains how to ensure seamless electrical compatibility, select the correct driver configuration, and fine-tune your setup through UPBv2 software integration.
Driver Requirements and Connector Type
Unlike third-party stepper motor controllers, which require separate driver boards (e.g., DRV8825 or TMC2209), the Pegasus Astro UPBv2 has an integrated bipolar stepper driver built into the unit. This eliminates the need for external drivers altogether, provided that the motor meets the previously discussed voltage and current limits.
Nevertheless, understanding driver equivalence is still useful.
The UPBv2’s internal driver functions similarly to current-limited bipolar stepper drivers, such as the DRV8825.
It supports basic full-step and microstep operation but not advanced features like stealthChop or sensorless homing, which are found in high-end drivers, such as the TMC2209.
There is no configurable current tuning knob or UART interface; the current is fixed by design and tailored for typical NEMA 17 motors under 1 A per phase.
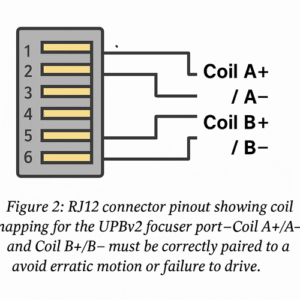
Figure 2 shows the RJ12 connector pinout and coil mapping for the UPBv2 focuser port. Coil A+/A− and Coil B+/B− must be correctly paired to avoid erratic motion or failure to drive.
Proper coil identification is essential when creating or adapting stepper motor cables. Always verify continuity with a multimeter, and consult the motor’s datasheet to determine the wire colors.
Physically, the UPBv2 provides a 6-pin RJ12 output for the stepper motor connection. Internally, this maps to:
| Pin | Function |
|---|---|
| 1 | Coil A+ |
| 2 | Coil A- |
| 3 | Coil B+ |
| 4 | Coil B- |
| 5 | Ground (GND) |
| 6 | Not used |
Many third-party stepper motors terminate in JST connectors or bare leads. This means that you may need to crimp a custom RJ12 cable or use an adapter. Make sure that your cable maintains the correct coil pairing (A+/A− and B+/B−). Reversing these can cause erratic movement or prevent the motor from turning altogether.
Best practices:
- Always double-check the polarity and coil order using a multimeter or datasheet.
- Use shielded cables if your setup is electrically noisy (e.g., heavy USB traffic or high-amperage power lines nearby).
- Avoid excessively long stepper cables, as this may introduce resistance or signal degradation.
Power and Signal Limitations
The UPBv2 is designed for astrophotography, where power efficiency and thermal stability are priorities. It is not intended to drive industrial-grade motors or support continuous high-torque applications.
Key electrical limitations:
- Maximum voltage: 12 V DC (shared with the UPBv2’s power input).
- Maximum current per coil: Approx. 1.0 A RMS (consult the official specifications to confirm the exact threshold).
- Driver behavior: Fixed current, constant-voltage driver with microstepping.
To avoid exceeding these limits:
- Select motors with a rated current at or below 1 A per phase.
- Do not assume that a motor labeled “12V” is a match—stepper motors are current-driven, so the current specification takes priority.
- Avoid sudden, high-load movements, such as rapid focusing with a heavy imaging train at startup.
If the motor attempts to draw more power than the UPBv2 can supply, it may trigger one of the following:
- Thermal shutdown of the internal driver
- Inconsistent or missed steps, especially during fast motion
- Complete focus system failure until the unit is power cycled
Therefore, it is critical to choose a motor that is well within the UPBv2’s performance envelope, not just at the edge of it.
Software Control and ASCOM Integration
One of the UPBv2’s biggest advantages is its seamless integration into astrophotography control software via the ASCOM platform and the Pegasus Unity software suite. This allows you to access and manage your stepper motor just like any other ASCOM-compatible focuser with support from tools like NINA (Nighttime Imaging ‘N’ Astronomy), Sequence Generator Pro (SGP), APT (Astro Photography Tool), SharpCap, and other ASCOM-capable apps.
Once connected, the software allows you to:
- Adjust the step size and travel limits to match your focuser’s range
- Configure backlash compensation, a critical feature that offsets mechanical slack in the focuser and stepper motor
- Control focus speed and ramping behavior to prevent vibration-induced blur during imaging sessions
Before enabling automated routines, run a manual calibration pass to understand your focuser’s full range of motion. Start by measuring how many steps it takes to move from one end of the drawtube’s travel to the other.
Then:
- Set backlash compensation based on the observed lag.
- Use the software’s autofocus routine to determine the optimal step size for your system.
- Test focus repeatability by cycling in and out of focus over several iterations.
These adjustments improve microstep resolution and reduce inrush current during direction changes. They also help extend the lifespan of the motor and driver by minimizing thermal load.
Recommended Stepper Motors for UPBv2 Focusers
In the previous section, we discussed how electrical and software compatibility directly impact the reliability and precision of your stepper motor setup with the UPBv2. From cable pinouts to current limitations and ASCOM integration, our goal was to ensure that even a well-specified motor performs correctly within the system’s constraints. Now, it’s time to translate those requirements into product recommendations.
This section highlights field-tested stepper motors that consistently perform well with the UPBv2. The motors are organized by telescope class and mechanical load. It also provides a side-by-side comparison of key specifications and offers guidance on where to purchase motors that meet quality and compatibility standards.
Trusted Models and Specifications
Over time, certain stepper motors have become go-to choices among amateur and professional astrophotographers using the UPBv2. These models have been validated across a range of telescope types and imaging configurations.
Below are several commonly recommended NEMA 17 stepper motors that balance torque, current draw, and mechanical compatibility with the UPBv2’s built-in driver.
| Model | Holding Torque (Nm) | Current/Phase (A) | Step Angle | Frame Size | Notes |
|---|---|---|---|---|---|
| Wantai 42BYGHW811 | 0.55 | 0.4 | 1.8° | NEMA 17 | Quiet and reliable with low current. |
| Omc-StepperOnline 17HS13-0404S | 0.3 | 0.4 | 1.8° | NEMA 17 | Compact; ideal for small focusers. |
| Moons’ MS17HD2P4100 | 0.45 | 1.0 | 0.9° | NEMA 17 | High resolution, tight tolerance |
| Usongshine 17HS19-1684S | 0.59 | 1.68 (⚠️) | 1.8° | NEMA 17 | Only usable with current limit. |
| LDO-42STH25-1404AC | 0.5 | 1.4 (⚠️) | 0.9° | NEMA 17 | Smooth motion; watch current draw. |
Note: Motors above 1.0 A/phase require careful thermal monitoring or external current-limited operation. Direct use is not recommended unless you have tested with the UPBv2 under load.
📊 Note on Specifications:
All torque, current, and step angle values in the above table are sourced directly from the manufacturers’ datasheets or official product listings provided by Wantai, Stepmotech, Moons, LDO, and Usongshine. Variations may exist between production batches. Users should consult the latest datasheet before purchase or integration.
💡 Case Example: When “More Torque” Fails
A user attempting to improve focus repeatability on a heavy imaging rig selected a 1.68 A-rated stepper motor (Usongshine 17HS19-1684S) expecting greater holding strength and precision. While the motor worked initially, it quickly caused the UPBv2 to shut down intermittently during long focus sweeps. The culprit? Excessive current draw. Without an external driver or current tuning capabilities on the UPBv2, the internal stepper circuit overheated and activated the thermal protection feature.
When replaced with a lower-current 0.4 A model, such as the Wantai 42BYGHW811, the system stabilized, and focus control became consistent, even under load.
Takeaway: Higher torque does not guarantee better performance. Match the current draw to the UPBv2’s safe operating envelope, and prioritize balance over brute strength.
For optimal compatibility, select motors with a current draw of less than 1 A per coil and a step angle of either 1.8° or 0.9°, depending on your resolution requirements. Higher-torque motors can be used cautiously if the mechanical load justifies it and your setup has adequate ventilation.
Use Cases by Telescope Type
Light loads (e.g., refractors with helical or manual Crayford focusers)
Example setups: 60–80 mm apochromatic refractors
Recommended motors: Wantai 42BYGHW811 or StepperOnline 17HS13-0404S.
Why it works: Smaller motors offer quiet, precise control due to low friction and minimal axial load.
Tip: Choose low-current models to minimize thermal load on the UPBv2 and reduce electrical noise in tightly packed imaging rigs.
Medium loads (e.g., SCTs with motorized Crayford focusers)
Example setups: Celestron EdgeHD 8″ and 9.25″ with aftermarket focusers
Recommended motors: Moons’ MS17HD2P4100 and LDO-42STH25-1404AC.
Why it works: These scopes require moderate torque to counteract mirror shift and gear backlash.
Tip: A 0.9° stepper provides the extra resolution needed for narrow, critical focus zones in SCT imaging.
Heavy-duty loads (e.g., RC telescopes or high-resolution imaging rigs)
Example setups: GSO RC 10″ or larger with motorized focusers
Recommended motors: Use the 17HS19-1684S from Usongshine with precautions or high-torque variants from Moons.
Why it works: These systems often carry heavy cameras, filter wheels, and OAGs, which significantly increase focus resistance.
Tip: Ensure your mounting system is rigid and actively monitor the motor’s temperature if operating near the UPBv2’s upper current limit.
Where to Buy and What to Look For:
Reliable suppliers are essential for avoiding issues like poor windings, inconsistent step angles, and low-grade bearings.
Recommended vendors:
- stepmotech.com: Excellent spec transparency and consistent build quality
- Pololu: Trusted source for motors with known current ratings
- LDO Motors via Printed Solid: High-grade stepper motors originally built for 3D printing, but suitable for fine astrophotography.
- Amazon (with caution): Check reviews and datasheets carefully, as some motors are poorly labeled or lack thermal specs.
What to avoid:
- Unbranded motors with no listed electrical specifications
- Motors with mismatched or oversized connectors (unless you’re prepared to rewire)
- Units that advertise “high torque” but have a current draw of more than 1.5A (not UPBv2-friendly)
Build quality indicators:
- Smooth shaft rotation without grinding or wobbling
- Clean solder joints and uniform coil wiring
- Presence of a datasheet or model number for reference
Installation Tips and Best Practices
Once you’ve selected a compatible stepper motor for your UPBv2-based focuser, proper installation is the next critical step. Even a high-quality motor can underperform—or worse, cause damage—if it is poorly mounted, incorrectly wired, or inadequately configured. The previous section outlined which motors work best and how to choose them based on telescope type. This section focuses on mechanical integration, clean electrical layout, and the calibration process required to unlock reliable, backlash-free focus control.
Mechanical Installation and Coupling
A stepper motor is only as effective as its physical connection to the focuser. If the coupling introduces play, wobble, or misalignment, all of the motor’s precision is lost at the mechanical interface.
*Figure 1: Comparison of a flexible beam (left) and a rigid clamp (right) coupler—flexible couplers accommodate misalignment and reduce stress, while rigid couplers require perfect alignment for zero backlash.*
Choosing the Right Shaft Coupler
- Use flexible couplers (helical or beam-style) when possible. These allow for slight angular misalignment without introducing backlash.
- Avoid rigid couplers unless your motor and focuser shafts are perfectly coaxial and mounted to a single rigid frame.
- Match the shaft diameters exactly. Typically, stepper motor shafts are 5 mm, but check your focuser shaft carefully, as some use 6 mm or 1/4″.
- Choose couplers with set screws on opposing sides to ensure a firm grip and concentric engagement.
To Ensure Motor Alignment and Secure Mounting
- Mount the motor on a rigid metal bracket, preferably aluminum, that won’t flex under load.
- Use washers and thread-locking compound (such as blue Loctite) to prevent loosening due to vibration during extended imaging sessions.
- Ensure that the motor shaft is aligned with the focuser shaft; even a 1–2° misalignment can reduce efficiency and increase wear.
- After tightening all hardware, manually rotate the focuser (if possible) to check for binding or stiffness.
Improper mechanical coupling is one of the leading causes of step skipping, backlash, and uneven focus movement, so this step should not be rushed.
Wiring and Cable Management
Cable layout is often an afterthought, but in astrophotography rigs, poor cable management can lead to intermittent failures, missed steps, or even permanent damage to your electronics.
Clean Routing and EMI Prevention
- Route motor cables away from high-current power lines (e.g., dew heater or mount cables) to prevent electromagnetic interference.
- Use twisted pair or shielded stepper motor cables to reduce induced noise on longer cable runs.
- Secure cables near the motor and the UPBv2 output with zip ties or adhesive cable mounts to prevent movement during slewing.
Strain Relief and Connection Security
- Avoid sharp bends or tension in the RJ12 connector or custom cabling. Use a strain relief loop before the plug to reduce mechanical stress.
- For custom RJ12 cables, use a high-quality tool to crimp them and verify continuity with a multimeter.
- Double-check coil pairing (A+/A− and B+/B−) before applying power. A reversed pair can cause irregular or stalled motion.
Tip: After routing, move your telescope through its full range of motion and observe how the cable behaves. If the cable pulls taut, catches, or rotates with the focuser, re-route it or add slack.
Testing and Calibration
After completing the mechanical and electrical setup, it is essential to validate the motor function and adjust the software settings to ensure accurate focusing.
Initial Spin-Up Checks
- Power on the UPBv2, then use the Unity software or your imaging suite (e.g., NINA) to command a few short movements.
- Confirm that the motor turns smoothly without stuttering, buzzing, or overheating.
- Then, reverse the direction and check for symmetry in the movement. Jerky or one-sided motion may indicate reversed coil wiring.
Backlash Compensation and Step Size Tuning
- Use the manual movement controls in your software to measure how many steps are required to move the focuser a known distance.
- Then, enable backlash compensation in your focuser software and tune it incrementally. A good starting value is 20–40 steps, depending on the quality of the gear and the load.
- Run a focus routine and analyze the curve shape. Flat spots or wide valleys may indicate that the step size is too coarse.
Once you have dialed in the backlash value and step resolution, your motorized focuser should deliver precise, repeatable focus adjustments, even across temperature shifts or telescope orientations.
Troubleshooting Common Issues
With the motor securely mounted, properly wired, and fully calibrated, most UPBv2 users should experience smooth, reliable autofocus routines. However, as with any integrated hardware system, occasional issues can arise, especially during initial setup or after equipment changes. The previous section covered best practices to prevent these problems during installation and calibration. This section focuses on diagnosing and resolving common issues that may affect stepper motor behavior when paired with the UPBv2 focuser port.
Motor Not Responding or Skipping Steps
One of the most common issues during initial testing is a motor that either doesn’t move at all or skips steps inconsistently.
Possible causes and solutions:
- Incorrect wiring or reversed coils: Ensure that the stepper motor’s coil pairs (A+/A− and B+/B−) are correctly mapped to the RJ12 connector. If a coil is miswired or swapped, the motor may buzz or lock without rotating. Use a multimeter to confirm coil continuity.
- Loose or mis-crimped connector: RJ12 plugs must be seated firmly. A poor crimp or pin contact can interrupt signals to the motor. Re-terminate the connector if needed.
- Overcurrent motor draw: Motors that require more than ~1 A per coil may fail to operate with the UPBv2’s internal driver. Select a lower-current motor, or test with no mechanical load to verify electrical compatibility.
- Mechanical binding: If the motor is installed off-axis or if the coupler is overtightened, the shaft may bind and stall. Disconnect the motor from the focuser and test it in free air.
- Driver fault or internal thermal shutdown: If the driver is overheating due to a motor exceeding its current specifications, it may disable the output temporarily. Power cycle the UPBv2 and allow time for it to cool down.
Pro tip: Command small focus movements (5–10 steps) and listen for a response. Silence usually indicates electrical issues, while buzzing without rotation often points to wiring or coil problems.
Noisy or Overheating Motors
While stepper motors produce some audible noise, excessive buzzing, vibration, or heating may indicate improper configuration or a hardware mismatch.
Common reasons for heat and noise:
- Excessive holding current: The UPBv2 driver operates at a fixed current. Pairing it with a motor rated for a much lower current (e.g., 0.3 A) can cause the motor to run hot, even while idle. Choose a motor with a current rating close to the UPBv2’s default.
- Continuous energizing: Stepper motors remain powered (energized) even when stationary. In high-precision motors with limited heat dissipation, this can cause the housing to reach 60°C or higher during long exposures.
- High-speed stepping without load: Running the focuser too quickly or without a load can cause resonances in the motor, resulting in a high-pitched whine or a mechanical rattle.
Solutions and adjustments:
- Enable microstepping. If your software allows, use at least 1/8 microstepping. This will smooth out the motor’s motion and significantly reduce noise.
- Reduce the maximum speed and acceleration settings in the software to avoid step loss and vibration during start and stop transitions.
- Improve the motor’s cooling and airflow, especially if it is mounted inside a closed tube or near heat-generating electronics.
Remember that a warm motor is not necessarily a problem, but it should never be too hot to touch. If you can’t hold your fingers on the casing for more than a few seconds, consider switching to a lower-current model.
Inaccurate or Jerky Focus Movement
Precision is key in astrophotography, and any irregularities in focus motion—even slight ones—can ruin an otherwise perfect exposure. These issues are often mechanical, not electrical.
Leading causes and fixes:
- Backlash not compensated: All mechanical focusers and gear trains have some degree of backlash. If this isn’t corrected in the software, the focuser may overshoot or fail to return to a previous position. Enable backlash compensation in your ASCOM or Unity settings, then test bidirectional movement.
- Poor mechanical coupling: If the shaft coupler is loose or flexes under load, slop is introduced between the motor and drawtube. Re-tighten the grub screws and check for shaft slippage under torque.
- Motor misalignment: Off-center motor installation can cause binding or uneven movement, especially at low step rates. Loosen the bracket, realign the shafts, and retest with gradual movements.
- Loose focuser tension or drawtube play: Some Crayford focusers rely on friction, which may be too low or uneven. Adjust the tension knobs to provide consistent drag across the focuser’s full range.
A field-tested tip is to perform a simple backlash test by racking in 100 steps, then out 100 steps. If the focuser does not return to the same optical focus point, increase the backlash compensation or inspect for mechanical give.
Conclusion
Selecting the right stepper motor for your UPBv2 focuser is about more than just the specs on paper—it’s about ensuring smooth, reliable, and accurate focusing every time you take a photo.
Throughout this guide, we covered the unique features of the UPBv2, how to evaluate motor torque, voltage, and step angle, as well as physical fit. We also discussed why software and electrical compatibility are just as important as mechanical installation. We also examined trusted motor models, practical mounting advice, and effective troubleshooting methods.
By now, you should have a clear understanding of what to look for—and what to avoid—when selecting a stepper motor for your setup. Whether you’re fine-tuning a refractor, upgrading your SCT, or building a high-precision system around a heavy imaging train, the right motor can significantly impact your astrophotography workflow.
Take the time to match your motor to your telescope and the UPBv2’s capabilities. Test it. Tune it. When everything clicks into place, you’ll be rewarded with crisp, reliable focus—no frustration, no guesswork.
If this guide helped clarify your next steps, consider bookmarking it for future builds or sharing it with others optimizing their imaging rigs. Every precise focus begins with the right foundation, and now you have the tools to make it happen.
References
- Pegasus Astro UPBv2 Product Page (Official specifications)
- Wantai 42BYGHW811 datasheet (PDF):
https://www.wantmotor.com/ProductsView.asp?id=155 - Moons’ MS17HD2P4100 Stepper Motor Specs (via Moons’ official site)
- Usongshine 17HS19-1684S Product Page (Amazon listing — check model number and current rating):
https://www.amazon.com/dp/B07D53ZXFY - StepperOnline 17HS13-0404S Specifications (Official shop listing)
- NINA Autofocus Plugin Documentation (for software integration reference):
https://nighttime-imaging.eu/docs/master/plugins/autofocus/
Additional Resources
- 📥 Download: RJ12 Pinout Diagram (PDF)
- 🧪 Guide: How to Use NINA for Automated Focus (NINA Documentation)
- FAQ: What Happens If You Overdrive a Stepper Motor? (StepperOnline Forum)
- ⚠️ Checklist: Common Causes of Missed Steps in UPBv2 Focus Systems
Frequently Asked Questions (FAQ):
Q: Can I use a unipolar stepper motor with the UPBv2?
A: Not directly. The UPBv2 is designed for bipolar stepper motors. Using a unipolar motor would require an external driver, which defeats the purpose of the built-in controller’s simplicity.
Q: What happens if I use a stepper motor rated for more than 1.2 A per coil?
A: The internal driver on the UPBv2 may overheat and shut down. Continuous use of motors with a higher rating can result in missed steps, thermal faults, or permanent hardware damage. Always choose a motor rated under 1 A RMS per coil for direct connection.
Q: Is microstepping necessary for astrophotography focus?
A: Absolutely. It greatly improves motion smoothness and reduces vibration, which is critical for fine focusing at high magnifications. One-eighth or one-sixteenth microstepping is recommended for most applications.
Q: Does motor orientation affect step accuracy?
A: Yes. Even slight misalignment of the shaft or skew between the stepper and focuser can cause mechanical binding. Use flexible couplers and ensure parallel mounting to maintain precision and reduce strain.
Q: Do I need to configure anything in NINA to use the UPBv2 focuser?
A: Yes. You’ll need to connect the focuser via ASCOM or Pegasus Unity, define the step size and backlash compensation, and run the autofocus calibration. Refer to the NINA Autofocus Plugin Documentation for detailed instructions.
About the Authors
timdmin
Technical Content Editor at WordPress
timdmin is a content creator who focuses on topics related to motion control and automation. Although they are not a motor engineer by training, they specialize in translating real-world lab testing, technical documentation, and expert insights into clear, actionable articles for engineers and makers. This article is based on independent research and collaboration with stepper motor professionals.
Technical review by Jimmy Coleman
Senior Systems Application Engineer at Kollmorgen
He has over 20 years of experience in the motion control industry, including integrating and tuning stepper and servo systems for CNC machines, robotics, and industrial automation. He reviewed the torque analysis, microstepping behavior, and driver tuning recommendations to ensure engineering accuracy and applicability.
Contact Jimmy Coleman at j.coleman@kollmorgen.com.